To connect to a server over SSH, open a terminal (or PowerShell on Windows 10 and 11) and type ssh user@IP, for example ssh root@203.0.113.10. The first time, you confirm the server's fingerprint, enter the password and land on the server's command line. Password logins, however, are both less secure and more tedious; the right way is to log in with an SSH key.
Generating an SSH key on Windows, Linux and macOS takes one command: ssh-keygen -t ed25519. It creates two files: a private key that stays on your machine and a public key (ending in .pub) that you put on the server or on GitHub. Below we walk through every step: creating the key, copying it to the server, shortening the connect command with a config file, adding the key to GitHub, and fixing common errors.
Short answer: To connect over SSH, run
ssh user@IPin a Linux or macOS terminal or in PowerShell on Windows 10 and 11. For passwordless login, generate a key pair withssh-keygen -t ed25519and put the public key (the.pubfile) on the server withssh-copy-idor by appending it to~/.ssh/authorized_keys. The private key should never leave your machine.
How do SSH keys work?
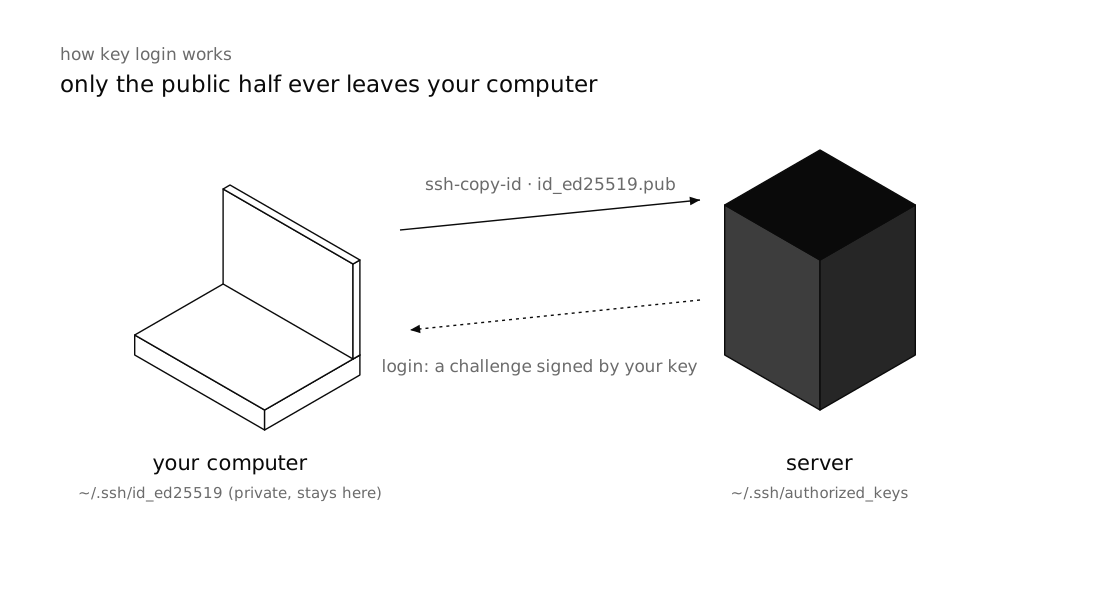
An SSH key is a cryptographic key pair. The public key is like a lock: you can install it on as many servers as you like, and it does no harm if someone sees it. The private key is the key to that lock and must never leave your machine. When you connect, the server sends a challenge that only the holder of the private key can answer, and no password ever crosses the network.
The recommended algorithm today is ed25519: its keys are short, fast and secure, and every recent version of OpenSSH and GitHub supports it. You only need RSA when dealing with very old systems, and then with at least 4096 bits.
Generate an SSH key on Linux and macOS
Open a terminal and run:
ssh-keygen -t ed25519 -C "you@example.com"The -C part is just a comment so you know later whose key this is; people usually put an email address or machine name. The command asks two questions:
- Where to save it: the default is
~/.ssh/id_ed25519. Press Enter unless you already have a key with that name. - Passphrase: a password that locks the private key itself. If your laptop is stolen, this is what stops someone using the key. We recommend not leaving it empty.
The result is two files:
~/.ssh/id_ed25519       ← private key; never share it
~/.ssh/id_ed25519.pub   ← public key; this goes on the server
To avoid typing the passphrase on every connection, hand the key to ssh-agent once:
eval "$(ssh-agent -s)"
ssh-add ~/.ssh/id_ed25519
On macOS and most Linux desktops the agent is already running, so ssh-add alone is enough.
Generate an SSH key on Windows
Windows 10 (version 1809 and later) and Windows 11 include the OpenSSH client, so you no longer need PuTTY. Open PowerShell and run the same command:
ssh-keygen -t ed25519 -C "you@example.com"The files are created in C:\Users\<username>\.ssh\. If you get "ssh-keygen is not recognized", install "OpenSSH Client" from Settings → System → Optional features.
The ssh-agent service is disabled by default on Windows. Open PowerShell as Administrator once and run:
Get-Service ssh-agent | Set-Service -StartupType Automatic
Start-Service ssh-agent
Then, in a normal PowerShell window, add the key:
ssh-add $env:USERPROFILE\.ssh\id_ed25519Copy the public key to the server
With ssh-copy-id (Linux and macOS)
The simplest way:
ssh-copy-id -i ~/.ssh/id_ed25519.pub deploy@203.0.113.10It asks for the user's password once, appends the key to ~/.ssh/authorized_keys on the server, and sets the permissions correctly.
Manually (and on Windows)
Windows has no ssh-copy-id, but this one-liner in PowerShell does the same job:
type $env:USERPROFILE\.ssh\id_ed25519.pub | ssh deploy@203.0.113.10 "mkdir -p ~/.ssh && chmod 700 ~/.ssh && cat >> ~/.ssh/authorized_keys && chmod 600 ~/.ssh/authorized_keys"If you have another way into the server (such as your provider's web console), you can copy the contents of the .pub file and paste it on a new line in ~/.ssh/authorized_keys. Each key is exactly one line; make sure your editor does not wrap it.
Now test it:
ssh deploy@203.0.113.10If you get in without being asked for the user's password (or are only asked for the key's passphrase), it works. At this point you can disable password login on the server; the details are in the first hour on a new Linux server. Test the login in a new window before closing your current session, so you do not lock yourself out.
File permissions: 700 and 600
OpenSSH is strict about file permissions. If the directory or files are writable by other users, it ignores the key and falls back to asking for a password. On the server:
chmod 700 ~/.ssh
chmod 600 ~/.ssh/authorized_keys
chmod go-w ~
And on your own machine (Linux and macOS):
chmod 700 ~/.ssh
chmod 600 ~/.ssh/id_ed25519 ~/.ssh/config
chmod 644 ~/.ssh/id_ed25519.pub
If you see UNPROTECTED PRIVATE KEY FILE when connecting, it is precisely the private key's permissions that are wrong.
Shorten your connect command with ~/.ssh/config
Once you have several servers with different users, ports and keys, remembering them all gets hard. The ~/.ssh/config file (on Windows, C:\Users\<username>\.ssh\config) gives each server a short alias:
Host app
    HostName 203.0.113.10
    User deploy
    Port 22
    IdentityFile ~/.ssh/id_ed25519
    IdentitiesOnly yes

Host staging
    HostName 198.51.100.20
    User deploy
    IdentityFile ~/.ssh/id_ed25519_staging
    IdentitiesOnly yes

Host *
    ServerAliveInterval 60
From now on, instead of the long command you just type ssh app. The same alias works with scp and rsync: scp backup.sql app:/tmp/. IdentitiesOnly yes makes SSH try only the key you specified rather than every key in the agent, which prevents the "Too many authentication failures" error. ServerAliveInterval keeps idle sessions from being dropped.
Add an SSH key to GitHub
With an SSH key, git push and git pull stop asking for a username and token.
- Copy the public key:
- Linux:
cat ~/.ssh/id_ed25519.pub - macOS:
pbcopy < ~/.ssh/id_ed25519.pub - Windows:
Get-Content $env:USERPROFILE\.ssh\id_ed25519.pub | Set-Clipboard
- Linux:
- On GitHub, go to Settings → SSH and GPG keys and click New SSH key.
- Give it a title (such as the laptop's name), set the type to Authentication Key and paste the key.
Now test the connection:
ssh -T git@github.comThe first time, you need to confirm GitHub's fingerprint; compare it with the official list in GitHub's documentation. A successful response looks like this:
Hi username! You've successfully authenticated, but GitHub does not provide shell access.From now on, clone repositories using the SSH URL: git clone git@github.com:username/repo.git. If you previously cloned a repository over HTTPS, switch its remote:
git remote set-url origin git@github.com:username/repo.gitFor a server that only needs to pull one repository, use a deploy key in that repository's settings instead of your personal key, so the server's access is limited to that one repository. The everyday Git commands are covered in essential Git commands.
Common errors and fixes
Permission denied (publickey)
The server accepted none of the keys you offered. Check, in order:
- Are you connecting as the right user? Is the key in that user's
authorized_keys, not root's? - Was the public key copied completely, on a single line?
- Are the 700 and 600 permissions correct on the server?
- If you have several keys, did you specify the right one with
-iorIdentityFile?
The best diagnostic tool is verbose mode, which shows which keys were tried:
ssh -v deploy@203.0.113.10If you have another way into the server, the server-side log tells you the exact reason:
sudo journalctl -u ssh -n 50REMOTE HOST IDENTIFICATION HAS CHANGED
SSH stores each server's fingerprint in ~/.ssh/known_hosts on first connect. If it changes later, you get this big warning. The usual cause is harmless: you reinstalled the server, or the old IP was assigned to a new machine. But this warning exists precisely to detect man-in-the-middle attacks, so before moving on make sure the change was yours. Then remove the old fingerprint:
ssh-keygen -R 203.0.113.10and reconnect to record the new one.
Connection refused or Connection timed out
Neither has anything to do with keys. refused means the server is reachable but nothing is listening for SSH on that port (the service is down or the port has changed). timed out means packets are not reaching the server at all; check the IP, the server's firewall (ufw) or your provider's firewall.
Frequently asked questions
Where are SSH keys stored?
On Linux and macOS they live by default in ~/.ssh/id_ed25519 (private key) and ~/.ssh/id_ed25519.pub (public key); on Windows, in the .ssh folder inside your user folder, C:\Users\<username>\.ssh\. On the server, authorised public keys go in that user's ~/.ssh/authorized_keys file.
Do I need PuTTY for SSH on Windows?
No. Windows 10 from version 1809 and Windows 11 include the OpenSSH client, so ssh and ssh-keygen work directly in PowerShell. If they are missing, install OpenSSH Client from Optional features in Settings.
ed25519 vs. RSA: which SSH key type should I use?
ed25519 is the recommended algorithm today: its keys are shorter, faster and secure, and all recent versions of OpenSSH and GitHub support it. RSA is only needed for very old systems, and then it should be at least 4096 bits.
Can I use the same SSH key on multiple servers?
Yes. The public key works like a lock that you can install on any number of servers and on GitHub, and exposing it carries no risk. For a server that only needs to pull one specific repository, though, a deploy key for that repository is better than your personal key.
Should I set a passphrase on my SSH key?
It is optional but recommended, because if your computer or laptop falls into someone else's hands, the passphrase is what stops them using the private key. Add the key to ssh-agent once and you will not have to type the passphrase on every connection.
Wrap-up
An SSH connection starts with a single ssh user@host, but proper work is done with keys: generate one once with ssh-keygen -t ed25519, protect it with a passphrase, put the public key on your servers with ssh-copy-id or by hand and on GitHub, and give each server a short name in ~/.ssh/config. Do not forget the 700 and 600 permissions, and reach for ssh -v first whenever something fails. After that, the real work on the server begins; essential Linux commands for servers is a good next step.